
Here are a few pointers to help transform your home's blank walls into design masterpieces. You've probably felt the frustration before: A blank wall staring at you, undecorated, barren... and the pieces of your favorite art are just sitting there, waiting nearby, unused. Time passes V…E…R…Y… S...L...O...W...L...Y... where to start? There is a right (and easy) way to hang art.
Here are the basics to remember:
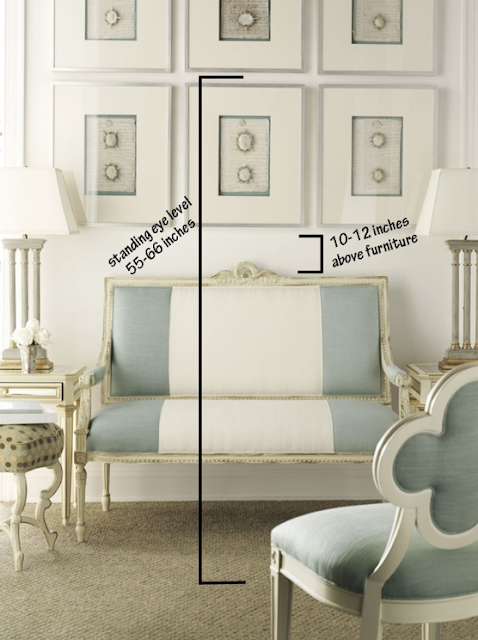
Eye Level
Your idea of art might include museum posters, children's drawings, priceless Picassos, or an eclectic mix. No matter what your tastes, art is best viewed at eye level - about 5 1/2 feet from the floor is a good rule of thumb. And, if there's any question, it's usually better to hang art lower than higher.
With that in mind... Think Inside the Block
 Think Inside the Block
It's a good idea to think in terms of groups or blocks of art. Be creative - mix prints, paintings, and drawings with plates or brackets or photographs. As you consider your grouping, take inspiration from the frames. The width of the frames can dictate the spacing between pieces. In general, you should hang larger pieces over smaller ones, unless the frame of the smaller piece is heavier. If you have several pieces from the same artist, try blocks of four, six, nine, etc., so they can be viewed as a single entity. On the other hand - "Hang work from different artists in a less strict manner to emphasize each piece's uniqueness.”
Measure Twice, Hang Once
Yes, you've heard... "measure twice, cut once" but you can also use the same principle when hanging art. Decisions won't seem so tricky if you lay out a map.
First, measure the space the grouping will take up. Then, model it out with masking tape on the floor, marking eye level (5 1/2 feet) for reference. Take everything into account as you measure, including furniture that will stand against the wall. If you're hanging art over a curved-back piece consider designing it so that the grouping follows the lines of the furniture. This is the time to experiment freely with spacing and proportion (and save your walls a few stray marks and nail holes).

Once you're satisfied with your grouping map, simply transfer it onto the wall. To avoid crooked art, keep a level handy, and hang everything using two nails rather than one. And, as you move on to the next bare wall, remember that rules are made to be broken. Try propping art instead of hanging it - this works particularly well on a mantel, chest of drawers, or sideboard. Pay attention to overlooked spaces, too – corners, over doorways, and archways are prime decorating spots.
Take a look around your house, is your artwork hung correctly?